Ordering and sampling procedures for liquid biopsy (including ctDNA)
Careful pre‑analytical practice, including sample collection, handling and transport, preserves the integrity of the sample and maximises the chance of detecting tumour‑derived material, especially in cancers known to shed low levels of circulating tumour DNA (ctDNA).
Overview
Liquid biopsy testing, including ctDNA testing, is increasingly used to assist in diagnosis and treatment of cancer.
Compared to analysis of solid samples, liquid biopsies are associated with:
- improved patient experience;
- reduced delays in diagnosis and treatment;
- reduced need for invasive procedures (for example tissue biopsy or surgery); and
- supporting earlier, more individualised treatment decisions.
When should a liquid biopsy (ctDNA) sample be taken?
Multi-target ctDNA tests are now included in the National Genomic Test Directory for the following clinical indications:
- Patients with radiologically suspected stage III/IV lung cancer, likely unsuitable for curative intent surgery or radical radiotherapy, and an ECOG performance status between 0 and 3.
- Patients with a confirmed new histological diagnosis of non-small cell lung cancer (NSCLC), previously untreated for advanced disease where diagnostic molecular testing has failed, and an alternative option would be to re-biopsy.
- Patients with locally advanced or metastatic oestrogen-receptor positive and HER2-negative breast cancer who have progressed through first-line treatment with an aromatase inhibitor and CDK 4/6 inhibitor.
- Patients with a carcinoma of unknown primary (CUP) who meet the following eligibility criteria:
- ECOG performance status 0–2;
- diagnosis of CUP origin as per the ESMO/NICE guidelines;
- discussion at a local CUP MDT confirming diagnosis; and
- not currently on treatment.
- Note: patients with a non-epithelial/non-neuroendocrine malignancy of unknown origin are not eligible for testing.
Why is sample handling so important?
Sample handling or storage cannot influence how much ctDNA the tumour sheds, but can change the ratio of tumour DNA to non-tumour background DNA, which is crucial in correctly interpreting the result. This can happen if sample handling or storage allows cells (for example, white blood cells) to break apart, releasing DNA: a process called cell lysis. This process can make it difficult to determine if a detected DNA change is coming from the cancer or from DNA released from a patient’s non-neoplastic (non-cancer) cells. Dilution of tumour DNA with non-neoplastic DNA will reduce the detectable variant burden, reducing test sensitivity, and may be a cause of a false negative result.
A number of factors can help stabilise ctDNA:
Using the right blood tubes will help prevent lysis (cell breakdown) and stabilise ctDNA.
- Most laboratories require blood samples for ctDNA to be collected in specialised cell-free DNA‑stabilising blood tubes that prevent lysis of cells. These tubes minimise the dilution of tumour-derived DNA with circulating cell-free DNA from blood cells (non-tumour sources).
- Examples of tubes used may include Streck cell-free DNA tubes or cell-free DNA collection tubes provided by commercial companies. It is important that you check with your local laboratory as to which tube they require.
Careful venepuncture
- A clean venepuncture with minimal tourniquet time can help to reduce cell breakdown.
Careful handling, storage and transport of tubes will minimise cell damage or degradation
- Under‑ or overfilled tubes change the proportion of blood relative to the additives in the tubes, and can compromise cell-free DNA stability.
- It is important to mix the sample gently and avoid vigorous shaking, which can damage normal white cells and result in release of DNA.
- Samples should be kept upright and at room temperature unless your local laboratory specifies otherwise (refrigeration can cause cell lysis in some tube types).
Limit delay between phlebotomy and sample processing
- Ensure that samples are sent to the laboratory promptly. Although the cell-free DNA‑stabilising blood tubes prevent lysis, they do not do so indefinitely. It is important to adhere to the advice provided by the laboratories regarding maximum time from sample collection to DNA isolation.
Table 1: How to avoid errors in sample collection and handling
| Error | Why it matters | How to avoid it |
| Inappropriate tube type | EDTA tubes allow rapid white‑cell lysis, increasing background cell-free DNA and diluting tumour‑derived DNA. | Use Genomic Laboratory Hub‑approved cell-free DNA‑stabilising tubes. |
| Under- or overfilling tubes | Incorrect blood‑to‑preservative ratio destabilises cell-free DNA and increases breakdown of white blood cells.
Sample may be rejected by lab due to quality control issues. |
Fill to the marked volume. |
| Vigorous shaking or rough handling | Mechanical stress breaks apart white cells, increasing background DNA and lowering detectable tumour fraction. | Gently invert 8–10 times.
Do not shake. Transport upright. |
| Delayed transport to the laboratory | Stabilising tubes degrade over time.
Delays increase background cell-free DNA and reduce sensitivity. |
Send to laboratory for processing as soon as possible after blood draw. Avoid taking samples on Fridays or close to public holidays unless lab confirms capacity.
Use agreed courier pathways. |
| Incorrect storage conditions | Temperature fluctuations accelerate cell degradation. | Store at room temperature (18°C–25°C). Never refrigerate or freeze whole blood unless informed by laboratory team to do so.
Keep away from heat sources and direct sunlight. |
Shipping samples
- Carefully complete the ctDNA test order form.
- Before shipping, ensure the appropriate ctDNA test order form has been signed by the consultant or delegated person.
- Carefully label the bottles.
- Ideally, samples should be sent as soon as possible. Samples should be received in the test laboratory within 48 hours of venepuncture.
- Ideally, try to avoid taking samples on a Friday. If this is unavoidable, please send the sample to the laboratory as soon as possible. It may be useful to liaise with the laboratory to let them know they should expect the sample.
What happens when a sample reaches the laboratory?
Once a ctDNA sample reaches the laboratory, the focus shifts from preserving the DNA to extracting, analysing and interpreting it in a way that maximises sensitivity and minimises artefacts. Every step can influence whether the result is informative or non‑informative.
The diagram below (figure 1) gives a brief overview of what happens in the laboratory.
Figure 1: The ctDNA sample pathway in the laboratory
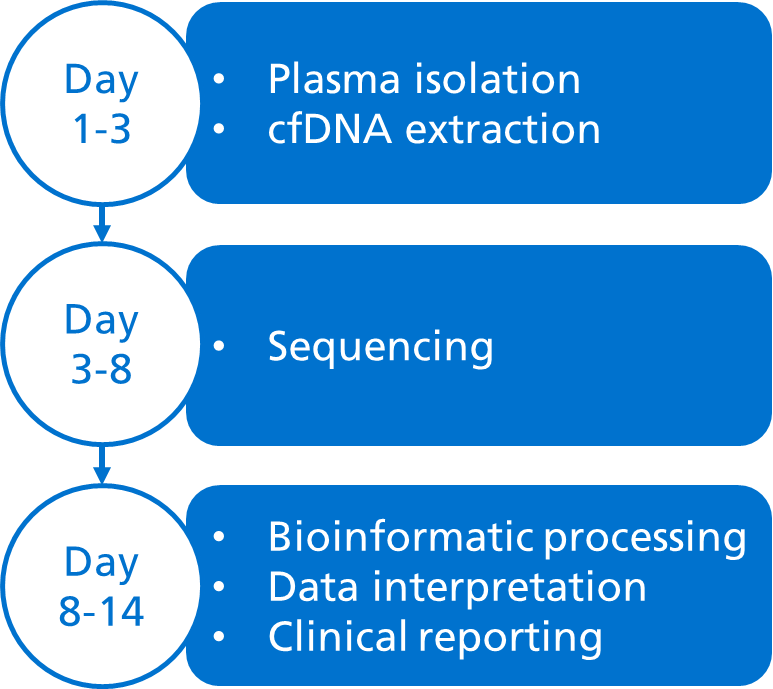
Most ctDNA tests use massively parallel sequencing (also known as next‑generation sequencing (NGS)), which allows millions of DNA fragments to be sequenced in parallel. It works by fragmenting DNA, attaching adapters and sequencing all fragments simultaneously, with powerful bioinformatic pipelines assembling the data to identify different types of genomic aberrations.
Importance of local policies and procedures
Different Genomic Laboratory Hubs (GLHs) use different blood bottles, sampling pathways and laboratory processes when performing liquid biopsy testing. It is important to adhere to your local policies and procedures to maximise the chances of having an informative result.
Key messages
- Good pre‑analytical practice preserves the integrity of the sample and maximises the chance of detecting tumour‑derived material.
- This includes sample taking, sample handling and appropriate storage of samples.
- Poor pre-analytical handling is one of the most common causes of reduced ctDNA assay sensitivity.